


Besrey Kick Scooter for Kids Ages 3-10, 3-Wheel Folding Scooter with Adjustable Height, LED Light Wheels, Extra Wide Deck for Outdoor Activities
EUR 53.47 (as of April 16, 2026 20:24 GMT +00:00 - More infoProduct prices and availability are accurate as of the date/time indicated and are subject to change. Any price and availability information displayed on [relevant Amazon Site(s), as applicable] at the time of purchase will apply to the purchase of this product.)Hoverboards, alternatively recognized as self-balancing scooters or hands-free segways, have recently gained significant popularity. However, akin to any electronic gadget, the batteries in these devices will inevitably require replacement. Replacing the hoverboard’s battery is simple but requires a certain technical expertise.
In this comprehensive guide, we’ll walk you step-by-step through the entire process of replacing the battery in your hoverboard.
Follow along with this guide, and you’ll be able to breathe new life into your hoverboard by swapping out the old battery for a fresh one.
When Should You Replace Your Hoverboard Battery?
Lithium-ion batteries, like those used in hoverboards, have a limited lifespan. The battery capacity diminishes over time and through repeated charge/discharge cycles.
Here are some signs that indicate it’s time to replace your hoverboard’s battery:
- Reduced runtime – If your fully charged hoverboard runs for half the time it used to, the battery needs replacing. Most hoverboard batteries last 1-3 years, depending on usage.
- Longer charging times – It takes significantly longer for your hoverboard to recharge fully. As batteries degrade, they take longer to charge.
- No longer powers on – If your hoverboard doesn’t turn on, the battery could die and need replacement. Try charging for several hours just to be sure.
- Swollen or bulging battery case indicates that the cells have expanded or ruptured and must be replaced immediately. Swollen batteries can be dangerous.
- Error codes – Some hoverboards display battery error codes like E01, E02, or E03 that signal battery issues. Consult your user manual for your model.
Don’t continue using a faulty hoverboard battery that shows any of the above warning signs. Replace swollen or damaged batteries right away and dispose of them properly.
What You’ll Need to Replace Your Hoverboard Battery
Before you open up your hoverboard to swap the battery, make sure you have all the required tools and parts:
Tools
- Screwdrivers – You’ll need small Phillips and flathead screwdrivers to remove casing screws.
- Soldering iron – For detaching and attaching battery wires and connectors.
- Electrical tape – To insulate wire connections.
- Voltmeter – To test battery voltage and polarity (optional).
Parts
- Replacement battery – Ensure the new battery matches the old one’s voltage, capacity, and connectors. Only use lithium-ion packs from reputable suppliers.
- Battery balance wires – The wires connecting battery cells may need to be swapped.
Safety Gear
- Work gloves – For handling the battery pack.
- Safety goggles – For eye protection while soldering.
- Dust mask – To avoid inhaling any battery debris/dust.
Other
- Clean rags – To remove grease or grime around the battery compartment.
- Isopropyl alcohol – For cleaning contacts on the battery and connectors.
- Ziploc bags – For storing screws and small parts.
Purchase all necessary tools and parts before taking apart your hoverboard. Having everything you need ready beforehand makes the process safer and easier.
Read Other Post: Best Insoles for Skateboarding in 2024
Step-by-Step Guide to Replacing a Hoverboard Battery
You’re ready to begin once you’ve confirmed your hoverboard battery needs replacing and gathered all the equipment.
Here are the detailed steps for safely removing the old battery and installing a new replacement:
Step 1 – Turn Off and Disconnect the Hoverboard
Make sure the hoverboard is powered down and disconnected from the charger. Please turn it off, unplug the charger, and turn it upside down.
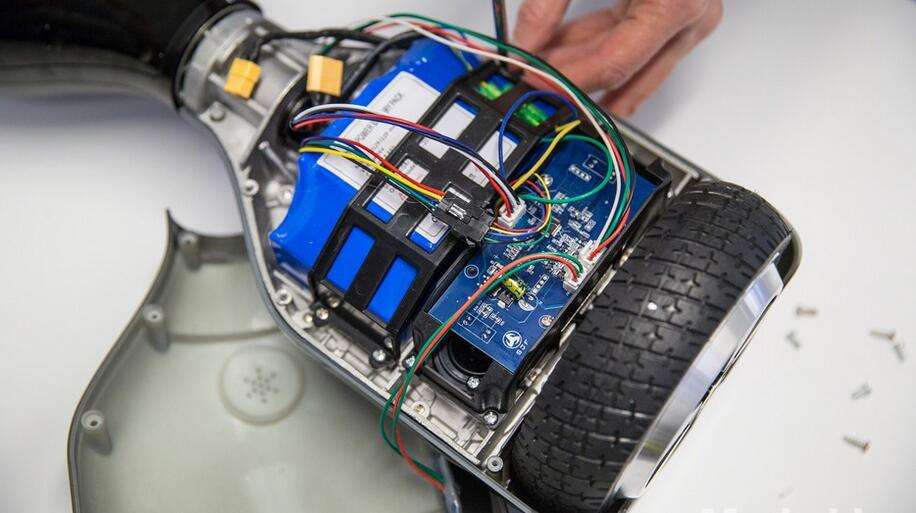
Step 2 – Remove the Cover
Using a screwdriver, remove any screws securing the bottom cover or battery compartment (placement varies by model). Lift off the cover to access the battery.
Step 3 – Disconnect the Wires and Connectors
Locate the battery wire connectors. Using needle nose pliers, carefully detach the connectors from the battery terminals. Depending on the model, you may need to desolder wires.
Step 4 – Remove the Old Battery
Once the wires are detached, lift the battery pack from the compartment. Inspect the package for any damage like swelling. Please place it in a fireproof Li-ion battery disposal bag.
Step 5 – Install the Replacement Battery
Set the new battery pack into place in the same orientation. Double-check that the voltage and capacity match the original battery specifications.
Step 6 – Reconnect the Wires and Connectors
Attach the connectors to the corresponding positive and negative terminals on the battery. Red wires typically indicate positive. If soldering, cover joints with heat shrink or electrical tape.
Step 7 – Check Voltage and Polarity
Use a voltmeter to verify the correct voltage and polarity—red probe to red positive terminal, black probe to black negative. Small sparks at this stage are normal.
Step 8 – Reinstall Battery Cover
Place the protective cover back over the battery compartment. Insert and tighten all screws previously removed.
Step 9 – Reactivate and Charge Hoverboard
Turn the balanced scooter upright, power it on, and fully recharge the new battery before first use. Check that it powers on and operates generally before riding.
And that’s it! By carefully following these steps, you can replace the batteries in most hoverboard models in about 15-30 minutes. Take precautions when handling lithium-ion batteries and dispose of old ones properly.
Read More: Best Long Range Electric Scooters for Adults in 2024
Disposing of or Recycling Old Hoverboard Batteries
Once you’ve swapped a new replacement battery, you must properly dispose of the old hoverboard battery. Defective or degraded lithium-ion batteries can be hazardous waste and must be discarded carefully.
Here are some tips for safely disposing of hoverboard batteries:
- Never throw batteries in regular household trash. Bring to a certified battery recycling center.
- Tape over the terminals before transporting old batteries. Prevent short circuits that could cause a fire.
- Store faulty batteries in safe, non-flammable containers like sealed plastic tubs.
- Check for battery recycling programs through your local waste management authority. Some accept household batteries.
- Take advantage of retailer take-back programs. Some stores recycle batteries purchased through them.
- Use battery disposal bags designed for transporting lithium-ion batteries. Purchase from online retailers.
- Bring batteries to e-waste collection events in your community. Call ahead to confirm that they accept hoverboard batteries.
- Contact the hoverboard manufacturer about battery return policies. Some have trade-in or return programs.
Proper battery disposal reduces environmental harm and potential safety hazards. Only attempt to open, puncture, or damage batteries after recycling. Handle them with care during transport.
Where to Buy Replacement Hoverboard Batteries
Once you know the voltage and capacity of the battery that originally came with your hoverboard, you can search for a suitable replacement. Here are some places to purchase replacement batteries:
- Hoverboard Manufacturers – Check if the company that makes your hoverboard sells replacement batteries through their website or customer service department. This ensures an exact match.
- Online Marketplaces – Large retailers like Amazon and eBay have many compatible replacement batteries from third-party sellers. Read reviews carefully.
- Local Electronics Stores – Brick-and-mortar electronics shops may carry generic hoverboard batteries that match standard sizes. Ask at radio-controlled hobby shops, too.
- Battery Specialty Stores – Websites like Battery Mart, Batteries Plus Bulbs, and Interstate Batteries sell batteries for many applications, including hoverboards.
- Repair Shops – Local electronics repair stores can often order and install suitable new hoverboard batteries. This gives you an expert installation.
Only purchase hoverboard batteries from reputable retailers. Counterfeit or low-quality batteries can be unsafe. Always match the original’s battery specs, like voltage, connectors, and dimensions.
Hoverboard Battery Safety Tips
Lithium-ion batteries can be hazardous if mishandled. Follow these battery safety guidelines when replacing your hoverboard power pack:
- Wear protective gear like gloves and goggles during battery swap.
- Carefully detach connectors rather than cutting wires. Avoid short circuits.
- Never puncture, crush, drop, or damage Li-ion battery cells.
- Install batteries in the correct polarity orientation to prevent reversed polarity damage.
- Only use replacement batteries that match the original voltage and capacity.
- Charge new batteries fully before first use. Follow the manufacturer’s charging instructions.
- Store and transport batteries in fireproof containers. Prevent exposure to high heat.
- Properly dispose of and recycle old batteries at certified hazardous waste facilities.
- Closely supervise children and don’t let them handle or replace hoverboard batteries.
Exercising caution and care when servicing the high power batteries in hoverboards reduces the risk of damage and injuries. Take your time and always put safety first.
Frequently Asked Questions About Hoverboard Battery Replacement
Here are answers to some of the most common questions about changing out the batteries in hoverboards:
How long does a hoverboard battery last?
On average, a hoverboard battery lasts 1-3 years with regular use before needing replacement. Heavy daily use will shorten lifespan. Properly maintaining batteries extends life.
How much does it cost to replace a hoverboard battery?
The average cost for a replacement hoverboard battery ranges from $60 to $150. More powerful or name brand batteries cost more. Labor costs extra if paying someone to install it.
How do I know which battery to buy for my hoverboard?
Check the battery voltage (typically 36V or 48V), capacity (Amp hour rating), and dimensions. Remove your battery and bring it to the store to match it up. Review the user manual/spec sheet.
Can I upgrade to a bigger, higher capacity battery?
Usually, yes, as long as the voltage remains the same. But measure the space to ensure a larger battery will physically fit. Confirm connectors match before purchase.
This FAQ helped clarify some common battery replacement questions. Don’t hesitate to contact us if you need any other help with the hoverboard!
Read Our Entity: Green Commuting with Electric Scooters:
Conclusion
Replacing the battery in a hoverboard every 1-3 years is necessary to keep it functioning at optimal performance. While the process requires some technical skills working with electronics, it can be completed by the average person in about 30 minutes by following the steps outlined in this guide. The most important aspects are taking proper safety precautions, sourcing a compatible replacement battery, and disposing of old batteries responsibly.
With some research and the right tools, you can save money by swapping the batteries instead of paying for professional repair. Just be slow and thorough when disconnecting and reconnecting delicate wires and connectors. Refer to the factory service manual for your particular hoverboard model for battery removal specifics.
Investing in a fresh new battery can extend the life of your hoverboard for years to come. Riding around on a scooter with degraded battery performance is no fun. Our guide has all the information you need to get your hoverboard’s power pack back up to par. Let us know if you have any other questions about the hoverboard battery!

I’m the founder of HoverboardsGuide.com, a comprehensive website dedicated to electric scooters and hoverboards. With a deep-rooted passion for electric gadgets, I’ve accumulated extensive experience in this field. I aim to assist users in selecting the best gadgets and providing reliable guidance.
I’ve tested and reviewed numerous models, gaining in-depth knowledge about their features, performance, and overall quality. Feel free to reach out to me with any queries, as I’m dedicated to addressing your concerns promptly. Join me on this exciting journey of exploring the world of electric rides and making informed decisions


